

Lesson Learned: with this project you can incorporate so many learning opportunities such as writing, spelling, the meaning of love, measuring, eye-hand-coordination, and math!
So, the little one and I made some friendship day cards for a few of his friends and his grandparents this past Friday. He thoroughly enjoyed this project, but I think he enjoyed “test tasting” the candy than actually putting together the cards. Every time I asked him to cut or stick something somewhere, he would say “hold on, I have to taste this one”. Anyhow, we were very frugal with this project.
Here are the supplies we used to make our cards in case you want to make something similar next year:
Red Poster Board
1 Square of Pink Felt
Heart Shaped Lollipops, wrapped
Chocolate Hearts, wrapped
Typing Paper
Glue Stick
Scissors
Pink Crayon
Stickers
Tape
Copier/Scanner(Optional..but I had him write “Happy Love Day” once on a heart shape cut out of typing paper, as sitting there with him to do write it 8 times properly would have worked both his and my nerves)
Brown Lunch Bags & Mailing Tape
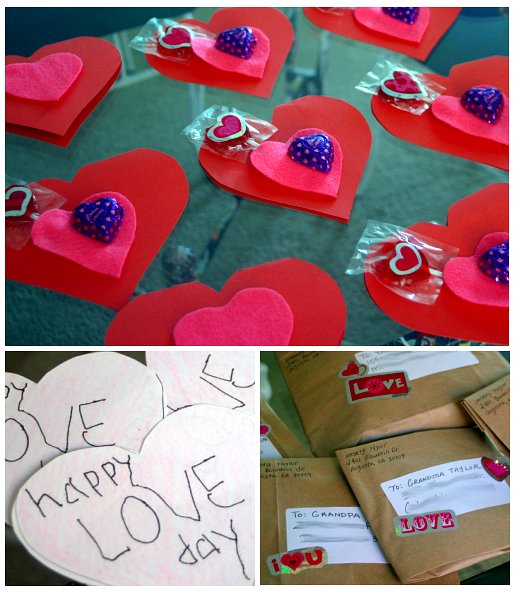
We were able to get 8 heart shaped cards out of a large piece of poster board. I folded it in half length wise first and placed my heart template over it. You want to be sure to have the fold in tact, as this is what will make it a “card” and not just single hearts. Then I strategically folded areas of what was left to get the remaining cards, as you will only get about 6 from your first fold. However, if you make your heart smaller, I am sure you could get a lot more from your initial fold.
With a pen or marker, draw a heart shape on a piece of typing paper that is slightly smaller than your cards. Then have your child write a message within it. If your child is learning to write straight, you may want to write the words out using dashes and let him/her trace over it. Then place on your copier and copy the amount needed. Color each heart with a pink crayon and proceed to cut the hearts out. Use your glue stick to adhere it to the inside of your cards.
Next your will assemble the front of the card. We just cut out small felt hearts. Our lollipops were wrapped in a clear wrapper, so we put heart shaped stickers in the center on each side of the wrapper. Then we positioned the lollipop where we wanted it(you can use a rolled piece of tape on the back of the lollipop wrapper to keep it in place if you like. Now glue your felt heart over the lollipop stick. Place a piece of rolled tape on the back of your chocolate heart and adhere it onto the felt heart.
Packaging: We used a simple brown paper lunch bag to mail our cards in. Lay your bag flat and cut the bottom square piece off. Place your card inside, making sure to leave room at the bottom and top for closure. Flatten the top of the bag so the edges are equal and roll the edges up. Secure with mailing tape. You can decorate the paper bag with stickers and if mailing, you can use labels for your address.


No comments:
Post a Comment